Screen printing on fabric at home. Printing on T-shirts at home. 1st step: Preparation
Perhaps each of us has ever wanted to transfer a favorite image or inscription onto fabric. Of course, you can use the services of specialized companies, but their services are not cheap, and why pay them for something that you can do yourself, at home.

How to print a design or text on fabric using a regular printer
To print on fabric we will need: a personal computer (laptop or tablet), a printer, tape (or a similar product), fabric (cotton works well, but you can use other fabric), paper (preferably thick) and scissors.

To begin with, we place the fabric on a sheet of paper and begin to paste it around the edges with adhesive tape, thereby firmly fixing it on the paper. This stage is very important. Make sure you do everything neatly and that the adhesive tape is firmly attached to the paper. Otherwise, it may damage your printer.
So, after completing the first step, making sure that the adhesive tape is not sticking out and the fabric is firmly attached to the paper, insert the paper into the printer and start printing. Make sure the sheet is inserted the correct way so that the print goes on the fabric and not on the paper.

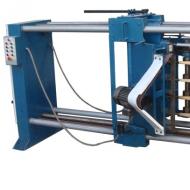
In the photo: a professional printer for printing on fabric.
When printing is complete, do not touch the resulting image as the ink is not yet dry. The paint should dry for twelve hours, even in the sun, but it will be more effective to use an iron (for about thirty seconds, you need to iron the resulting image through a thin sheet of paper).
When the paint is dry, carefully remove the fabric from the paper. The resulting image can be cut out, sewn somewhere, or used as a case for phones or tablets. The scope of application depends on your imagination.

In the pictures: another way to transfer an image to a T-shirt.
Video. Printing on a T-shirt using a regular inkjet printer at home
Another video: How to print a drawing with your own hands on a regular inkjet printer in 5 minutes
Textiles with various prints have long ceased to be in short supply. Various manufacturing companies offer a myriad of products. But today we will talk about whether printing on T-shirts is possible at home, whether it is possible to make an exclusive item yourself. If a drawing can be printed on paper, then why not transfer it to fabric? Let's try to create unique clothes with our own hands.
What will you need for work?
To transfer photos to textiles, you will need:
- Color inkjet printer.
- T-shirt.
- Iron.
- Thermal paper.
Important! Only an inkjet printer should be used.
- The fabric for printing must be of good quality - cotton, without synthetic threads.
- Another important nuance. It is desirable that the fabric be white. Thermal paper has one feature: the design transferred from it to the fabric will be on a white background. There is also colored thermal paper on sale; you can match it to the shade of the fabric. However, it is not cheap.
Important! It is important that the item fits you not tightly, but rather loosely. Otherwise, the image will crack very quickly.
Let's start thermal transfer
How to print on T-shirts at home? The technique is in many ways reminiscent of children's decals. The only difference is that to “translate” the picture onto the fabric you will need not water, but a heated iron.
The procedure is as follows:
- Using a printer, print out the image that you are going to transfer to textiles. Trim any unnecessary paper around the edges of the image.
Important! Before printing, using a graphics editor, flip the image “mirrored”. In this case, it will appear correctly on the fabric. This is especially important for text.
- Lay the T-shirt on the ironing board and thoroughly iron the area where the design will be applied.
- Place the thermal paper on the front of the T-shirt, image side down.
- Preheat the iron as high as possible. Iron the paper for 3-4 minutes.
Important! The iron soleplate heats up the most in the central part, so use that part.
- Leave the thermal paper to cool. Then carefully remove it from the fabric by pulling the corner.
Important! If you see that the paint clings not to the fabric, but to the paper, repeat the procedure again.
Do you need it?
It is generally accepted that handmade items will cost less than factory-made products. You can’t argue with the laws of political economy - most often, this is true. This number does not work with prints on T-shirts.
Do-it-yourself T-shirt printing is an exception to the rule:
- A pack of special paper costs about 15 USD. e.
- Add to this the cost of purchasing a T-shirt. It is necessary that the cotton be of high quality. On cheap Chinese things, the print quality will be appropriate.
Important! Most likely, you will have to purchase several T-shirts, since the first pancake will come out lumpy. And it’s not a fact that only the first one.
As for the services of professional application of an image on a product, the cost of the work is only 3 USD. e. In addition, using a heat press to process a design cannot be compared with an iron. The image is much more durable.
Care
A T-shirt with a thermal transfer print is quite difficult to care for:
- You can wash it in a machine, but at a temperature not exceeding 30 degrees.
- Before washing, the item must be turned inside out.
- Iron the product at medium temperature, covering the design with tracing paper.
Important! With good care, this image will retain its original appearance even after 20 or more washes.
Video material
Basically, if you love doing different experiments at home and doing handicrafts, then t-shirt printing at home will be an interesting experience for you. And whether you will continue to have a desire to transform your clothes in this way or not - it depends on how well everything turns out and in what style in general you are used to dressing. In any case, good luck if you plan to bring this idea to life!
Silk-screen printing (screen printing) is a printing technique that is used to quickly transfer a screen image onto various objects, most often clothing. For silkscreen printing, you will need a mesh stretched over a frame and a stencil. As you apply the design, you will need to press down on the stencil and mesh to force the ink through the pores onto the fabric, paper, or other material. Knowing how to do screen printing at home will allow you to create unique items of clothing and other things, and thanks to the stencil, you can apply the same unique design to as many different objects as you like.
Steps
Production of mesh and frame for silk-screen printing
- In many stores you can also find special blanks for silk-screen printing, so you can either purchase a standard blank or make your own.
- Make sure the stretcher is large enough to accommodate your stencil. If you're not yet sure what design you want to make, or want a versatile stretcher that will fit a variety of stencils, buy a stretcher that measures 30x45cm or larger.
-
Buy a mesh of the required size. You will need a fine mesh that will allow the ink to pass onto the fabric, paper or other material. Meshes come in different types, and their frequency is characterized by the number of threads per square centimeter. The denser the mesh, the more complex details you can achieve.
Attach the mesh to the stretcher using a stapler and staples. Before you start securing the mesh with a stapler, make sure that there will be enough mesh to stretch it onto the stretcher. You should pull the mesh over the frame as tightly as possible, but be careful not to tear the mesh. Stretch the mesh and secure it with staples every 2.5 - 5 cm.
Place the stencil backwards in the center of the grid. The frame should face up with the side on which the emulsion is applied. The mesh should be a few centimeters above the table surface - it should lie on the stretcher. Place your stencil in the center of the grid, leaving 10-12cm of space between the design and the edge of the frame.
-
Turn on the light for the required time. Simply follow the directions on the emulsion bottle and remove the mesh frame when ready. When everything is ready, remove the stencil and leave it aside. If you feel something burning while drying, turn off the light immediately.
- If you have prepared the emulsion correctly, you should be able to see a faint outline of your stencil in the emulsion when you remove it.
Buy a stretcher - you can find it at any art supply store. These are ordinary inexpensive wooden frames for securing the canvas. By paying a little more, you can get an aluminum frame that will last longer, as repeated washing can warp the wood.
Unique prints on T-shirts, bags, caps and other items of clothing have become especially popular today. With the help of an image printed on a T-shirt, a person can, without saying a word, tell about himself, if not everything, then the most important thing.
A T-shirt or cap with the image of your favorite musical group, movie character or book can be bought at any specialty store. One of the many souvenir workshops will help you apply photographs of your loved one or just a unique picture. In this article we will look at how to print on fabric at home with your own hands.
Materials for printing on fabric
The process of transferring an image onto fabric is called thermal transfer. In the process you will understand why. So, what will be useful to us for printing on fabric at home:
- home printer (preferably inkjet);
- special transfer paper;
- iron;
- base for application;
- piece of matter.
Do not use ironing boards or tabletops made of metal, glass or wood as a work desk. For example, a marble slab will do. The main thing is that the material on which you will work is heat-resistant.

DIY fabric printing
Now let's proceed directly to the thermal transfer process. First you need to prepare the image for printing. If you don’t know any of the graphic editors, such as Photoshop, and don’t have the time to master it, you’ll have to be content with ready-made pictures that you can download on the Internet.
When preparing a picture, it is important to remember that a household printer is not capable of printing with white ink. That is, all absolutely white areas of the image will simply be unprinted. That is, during thermal transfer, white will acquire the color of the base. Keep this in mind when choosing an image.

Once you have decided on the image, you can start printing. However, before doing this, carefully read the instructions on the pack of paper. The fact is that some types of paper transfer images in a mirror image, and some “as is”.
If you are printing only a photograph, this does not matter much, but if there is text in the image, you definitely need to pay attention to this point, otherwise you will only be able to read the “message” on the T-shirt with the help of a mirror.
If you decide to do your own fabric printing, keep in mind that printing an image is only half the battle, and the simplest one at that.
Professionals have a special heat press at their disposal, and the process of transferring an image from paper to fabric takes them no more than 30 seconds. We have to be content with a regular iron and spend at best five minutes on the whole process.

Transferring the image to fabric:
- To save time, cut around the perimeter of the image, leaving about an inch of unprinted area around the edges.
- After this, place the printout face down on the cloth and cover it with a piece of soft cloth.
- Next, carefully iron the entire surface with the hottest iron possible, especially in the corners, and let the fabric cool slightly.
- If it is better not to rush with the ironing procedure, then the second phase, on the contrary, should not be particularly long. Otherwise, it will be extremely difficult to remove the backing without damaging the image already transferred to the fabric.

Perhaps each of us has ever wanted to transfer a favorite image or inscription onto fabric. Of course, you can use the services of specialized companies, but their services are not cheap, and why pay them for something that you can do yourself, at home.
How to print a design or text on fabric using a regular printer
To print on fabric we will need: a personal computer (laptop or tablet), a printer, tape (or a similar product), fabric (cotton works well, but you can use other fabric), paper (preferably thick) and scissors.
To begin with, we place the fabric on a sheet of paper and begin to paste it around the edges with adhesive tape, thereby firmly fixing it on the paper. This stage is very important. Make sure you do everything neatly and that the adhesive tape is firmly attached to the paper. Otherwise, it may damage your printer.
So, after completing the first step, making sure that the adhesive tape is not sticking out and the fabric is firmly attached to the paper, insert the paper into the printer and start printing. Make sure the sheet is inserted the correct way so that the print goes on the fabric and not on the paper.
In the photo: a professional printer for printing on fabric.
When printing is complete, do not touch the resulting image as the ink is not yet dry. The paint should dry for twelve hours, even in the sun, but it will be more effective to use an iron (for about thirty seconds, you need to iron the resulting image through a thin sheet of paper).
When the paint is dry, carefully remove the fabric from the paper. The resulting image can be cut out, sewn somewhere, or used as a case for phones or tablets. The scope of application depends on your imagination.
In the pictures: another way to transfer an image to a T-shirt.
Video. Printing on a T-shirt using a regular inkjet printer at home
Another video: How to print a drawing with your own hands on a regular inkjet printer in 5 minutes
Articles on the topic